Toast Jelly and Cheese. Now don’t ask me why I’m on this breakfast kick but I am. That is really one of my all time favorite everyday breakfasts. We have some nice homemade-ish cherry preserves. Extra sharp cheddar and a grainy toast. Tough to beat for breakfast or an afternoon coffee break.
Ryanne started on the Show Gig upholstery this week. At this point she is working through the flat cushion. The back will be next once the seat frame is painted black. As you can see we are going with a really attractive medium tan wool broadcloth. It is trimmed with black piping and lots of buttons. I really like that look and it was traditional to see that treatment on antique carriages.
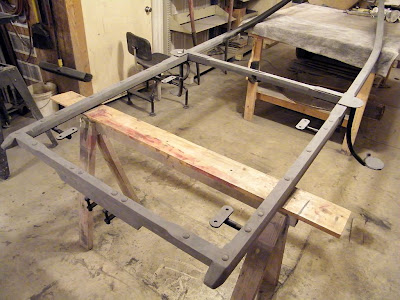
The chassis went into final coat primer yesterday and today Brandon worked on final sanding. He is coming along pretty good and looks to be almost done. Once he finishes up sanding this portion will be ready to paint.
Here you can see how the final sanding looks up close. As you can see we don’t go through the primer this time. If you look back to the first sanding you will notice sanding through the primer in numerous areas as we block sand which levels the primer and surface.
Here are the beginnings of the parts that are ready to paint. I think Dale said he will be shooting some of those parts tomorrow.
Back in the fab shop we have the first Sprint cart frame together. This is our new design and we still have a few welding jig modifications to update. It’s a great looking frame and I’m confident will continue to be a hot selling vehicle.
Busy day today. It has been very busy for January. Today was one of those days that fly by with numerous customers, phone calls and work to accomplish in the shop. It’s been hectic most of the month. It is great to be busy and I’m optimistic that is a sign of good things to come in the new year.
Have a great Friday!
Ciao!
T
Thursday, January 28, 2010
Wednesday, January 27, 2010
Ye Olde Columbus
Biscuits and gravy with an egg on top. That was breakfast this morning. I know not healthy but man it’s good. Make the egg over easy and that is about as good a way to start the day as anything. I like egg. I like biscuits. I like gravy. Put them together and now you’ve really got something.
This is a postcard that I have yet to see. Click it. I think this is a really great shot taken at the Fireman’s Park. The building is the Rest Haven but look at the cannon! Is that cool or what? Wonder what happened to that thing? I think I need to have a little talk with Jack Rhodes. Jack is the official cannon builder for the City of Columbus and I think he needs to replicate that thing.
Below the Dam in Columbus. If I really studied this I suppose I could figure out just where it was taken. Maybe someone else knows but it must be down by River Road someplace.
Now this is the former High School. I think this is now what’s called Dickason School. There is an older portion that is still in place and in use. I’m pretty sure this is it.
The Library. I really like the Columbus Library building. Good architecture that has stood the test of time. It is a Carnegie Library and carries the name Williams Free Library. One of 1,689 public libraries built in the United States funded by Andrew Carnegie.
And finally a bird’s eye view of Columbus. These photos seemed to have been really popular back at the turn of the century. Everyone must have been fascinated by flight at that time. I'm guessing this one was taken from atop the smoke stack at the canning factory. I'm thinking Rod should replicate this photo by scaling the old stack. It's still there and looks fairly sturdy to me.
We planned to begin our more interesting life tonight. Head to Madison for dinner and enjoy a night out. Before I knew it I looked at the clock. It was 7:00 and I was still in the shop cutting parts. Maybe tomorrow we’ll start our interesting life.
Have a great Thursday!
Ciao!
T
Tuesday, January 26, 2010
Blogger’s Block 2010
I’m running out of good material. I need to start living a more exciting life so I have some new material for my monologue. Have not been anywhere in ages. I used to be on the road all the time. Out for dinner? No, can’t say as we have. Exciting new activity? No. I guess I need to work on that.
This was our final building project of 2009. We finished it in November which was really pushing the season. We have this little building on Dickason Boulevard just down the street from our showroom. It was in pretty sorry need of a fresh coat of paint. We painted it about 5 or 6 years ago but this building is allergic to its skin. It just keeps peeling. It has many coats of paint but the original first coat has no interest in remaining on the building. So it’s a never ending paint job until all of that original paint finally peels off. Now it really did turn out nice. Cheryl picked great colors and is a meticulous trimmer. Good for another five years.
The Gig chassis made it through its first sanding. Brandon has it ready for the next coat of primer which will happen tomorrow morning.
This is the appearance of the primer after sanding. We use a block to sand so we level as we fill the grain of the wood. Looks to me the grain filled nice this go round so one more coat will do the trick.
The body is ready for a second coat of primer as well. The seat rail has been fabricated and primed. This portion is ready to be painted black. Once the rail has been painted the seat back can be upholstered. We are going with a medium tan wool fabric with black piping and buttons. Tradition in style and elegant in appearance.
The fab shop has a number of things going on one of which is a run of Sprint Cart frames. Here is our first frame of that run. Some of this is the frame jig and some of it is the frame itself. In this shot the main frame is tacked but there are still a number of additional parts to add before it’s a complete frame. In late 2009 we completely redesigned the Sprint frame into a more streamlined, lighter and stronger unit. It looks very nice and performs beautifully.
I don’t know. I can’t think of anything good to say here either. Oh well.
Have a great Wednesday!
Ciao!
T
Monday, January 25, 2010
Jack Frost is Not Dead
Well unfortunately the Vikings lost their game against the Saints on Sunday. I was actually hoping they would pull it off and in reality they should have. But of course Brett threw a pick at the worst possible time to kill the winning drive. Jeez, who would have ever seen that coming? Certainly not a Packer fan. The Vikings played really good football and certainly well enough as a team to win. A classic case of Brett trying to be a hero instead of taking the few yards he had and setting up the field goal. Just when you had me cheering for the Vikings too…
I don’t think I've ever shared this photo on my blog. I think it just might be one of my all time favorite photos of Columbus. Click on it to enlarge. It was taken by my buddy Rod Melotte back in December of 2009 when we had like four feet of snow. So wintry and festive all at the same time. Get ready. Sounds like winter is ready to return.
Dale was laying stripes on the wheels of the Show Gig today. The stripe is gold, predominant color is deep maroon and all trimmed in black.
The chassis is in first coat primer and in the midst of the first sanding. Here the bottom side is being sanded with 220. Should be getting close to ready for second coat primer by the end of the day tomorrow.
This is the axle and suspension. It is in final coat primer and being sanded with 320 just before paint. This portion and a few other parts will be ready for paint tomorrow.
Back in the fabrication shop we are in the early stages of a batch of ten Sprint Cart frames. The main tube frames have been bent and cut to shape. From here the spring and seat mounts are attached and then on to the main frame jig. We should have this batch of frames fabricated in a week or so and ready for powder coat finish. We will have a nice selection of Sprints available for early spring delivery so place your order today.
I used to love working on my car. I have a pretty good mechanical mind and given enough time I can figure out just about anything. That being said it’s been years since I’ve really messed around with our car. Just seem to be too busy. Well the car needed front brake pads. I can do that. Well it actually went pretty well. Front disc brakes have not really changed much in the last ten years. Only thing I really noticed was how light the car is built. Used to have this big ass frame to put the jack under. Not any more. I wasn’t quite sure where to pick the thing up. Wonder why the doors won’t open? That’s weird.
Have a great Tuesday!
Ciao!
T
Friday, January 22, 2010
The Big Red Grand Finale
Big night for Conan Obrien. His final night as the host of the Tonight Show. Not that I would be the first person NBC should call but I could never quite figure that one out anyway. I guess he has a loyal fan base. Sometimes funny but I just don’t see him in that slot. Believe it or not, he’s a little too weird for me most of the time. I will be watching his show tonight though just for kicks.
I managed to wrap up the construction of the Show Gig this morning. Last night I spent the evening polishing off the metal fabrication and the steps. Here we have the right step fitted, welds ground and all ready for a coat of primer.
Now I’m all done with the chassis. I’m ready to fit the body. We’ve set the body between the shafts but the actual body mounts were not there to make the connection.
We have four of these body mounts coming off the chassis. I’m ready to set the body and drill the holes for the bolts that will hold it in place.
Everything fit very well and the body is bolted in place. I jump up to check the balance which is just right. This carriage has long side springs which are nice and comfy when I jump up and down. It’s going to be a nice ride.
The body comes back off and the shafts head into the booth for the first coat of primer. Dale had a few odds and ends to finish up for me then two heavy coats of black primer. This will be sanded with 220 grit before it returns for a second coat.
It’s pretty easy to see how heavy the primer is when you see it up close. The first coat will fill most of the grain in the wood. What this coat doesn’t catch the next one will.
Sounds like it’s going to be a warm Saturday but the cool down begins on Sunday. I’ve really been digging this warmer weather. It’s been a nice break from winter and made the first half of January move along pretty quickly.
Have a great weekend! See you again on Monday.
Ciao!
T
Thursday, January 21, 2010
Texas Two Step
So the big news in Columbus these days is my buddy Nathan Roberts. Nate is a third generation fabricator from a long line of blacksmiths. His business is called Fiske Inc. Fiske manufactures the majority of the specialized trucks and trailers you see on the road transporting LP tanks. Boom trucks and saddle trailers that pick up the tanks and haul them away. He had been operating from the buildings that his grandfather started up his business in which are cool but small. It was time to make a change. He just purchased a manufacturing facility in Columbus that closed about a year ago. He will be adding employees and will have plenty of room for them in the 27,000 square feet. Congratulations Nathan!
Meanwhile back at the ranch we are continuing our Show Gig. I’m working on the steps which will consist of a pair of steps on each side. One will be a drop step and the other will be a step plate mounted on top of the shaft. I’m in the process of mocking up the upper step plate here which will be incorporated into a brace that bridges our shaft and cross brace connection.
Being it’s an odd shape this plate will be pretty easy to make up from three pieces of steel. I’ve cut and trimmed the pieces and as you can see they are welded together.
To make them look like one bigger piece of steel we grind off all the welds. It is being fastened with two stove bolts through the cross brace and two wood screws into the shaft. Those fasteners are counter sunk and then filled to conceal.
With the upper plates complete now we are going to begin work on the drop steps. I've bent the drop rods with a long sweeping bend and we will fasten our round step on the bottom of that rod. Here are my parts. The long stems still need to be cut to fit. They will run down the edge of each shaft and up to the under side of the upper step.
Now complete the steps have a traditional look and they are nice and solid. Notice there is a little ear on each side of the step itself which keeps your foot from slipping off. That is an antique feature and we like to copy that detail as it’s practical as well.
One of these days I’m going to start walking and running again. I fell off the wagon when I contracted the cold that wouldn’t leave. Maybe tomorrow. Then again sitting here eating chips and salsa isn’t a bad deal either. Tomorrow is Friday already? Holy crap.
Ciao!
T
Wednesday, January 20, 2010
Bad Ass Saw
Cutting steel in many shapes and sizes is pretty easy today with the right equipment. I’ve cut it by hand with a hack saw. Cut it with a sawzall and a metal blade. A grinder with a cutting wheel. For years most of our cutting was done with an abrasive chop saw. It’s noisy, throws sparks, creates smoke and dirt all over the shop.
These days we use what is called a cold saw. It’s much like a miter saw that you might cut wood with but slower speed and coolant to keep the blade sharp and cool. It cuts accurately and clean without the mess.
This little video is pretty interesting if you are into tools or have never seen how a cold saw functions. That's me on the bike in the intro. Our saw is a Baileigh and we are really happy with it. Cuts steel like warm butter.
Spent the day working on the Show Gig again today. I’m working on the final assembly of the chassis itself. The shafts are obviously wood but they are lined with 1 ½” x ¼” steel plate on the bottom side. I’m in the process of fastening that steel to the shafts. I’m drilling and installing bolts in this shot.
Here is a close up view of a body mount. At this point it is just a rod tack welded onto the steel. Once we have all the holes drilled we will remove the steel plate one more time to weld the mount solid as well as add a bracket to fasten the body.
At the intersections of the cross braces we add a short dogleg of steel on the bottom side as a reinforcement. We have four main joints in the shaft frame and I have those parts cut and ready to install.
Here is one of those pieces. It is clamped in place and ready to tack weld. Once again this will be welded solid to the main frame when it is removed from the wood. This shot is taken from the floor looking up under the frame.
And here we have some wheels. These roller bearing wheels are now painted deep maroon. Our client selected the maroon in combination with black and a gold fine line stripe which will be very sharp. These wheels will sit for a few days before they are trimmed in black and striped in gold.
Hope you all had a great Wednesday. I never really managed to get myself out of the shop today other than to walk up to the mailbox.
Ciao!
T
Tuesday, January 19, 2010
The Emperor Has New Shoes
So does anyone else have the crud that won’t quit? Jeez. Enough coughing already.
Check out this video. It’s actually a backdrop for a music video for a French band called Air. I’m kind of digging the music by Air but the video is pretty entertaining as well. Taken from the front seat of a street car in San Francisco in 1906. Horses, carriages, wagons, bikes, cars and street cars all moving on the same space. It’s fairly long but a good look back at history.
So do you think I needed new work shoes? You know if it was summer I think I could have gotten a couple more months out of them as the other one is fairing a little better. The snow tends to be a bit of a problem.
I’m thinking my new shoes are so cool that I should be preserving them for social activities rather than work. Let‘s see, sort of forgot what social activities are. Where is that duct tape anyway? Maybe I can patch up the old pair and get by just a little longer.
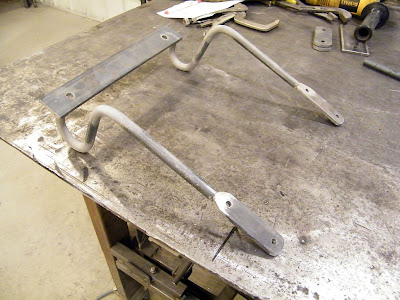
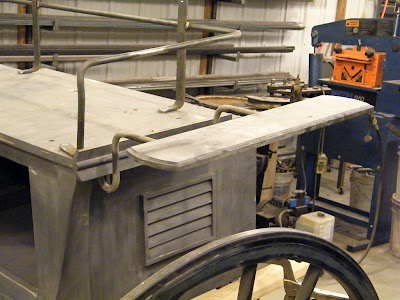
Yesterday I worked on fender brackets for our Show Gig project. We need to fasten to the under side of the seat, bump down and around the seat valance and then up high enough to clear the wheel. Here I have the shape bent for half of a bracket set.
The part coming off the body is ½” rod. We need to fasten the fender to that rod so we extend a portion of 1” x ¼” flat with mounting holes.
Once the fender brackets are bent they need to be connected to the body. To accomplish this I used a 1 ¼” plate with a couple of holes to bolt to the seat frame itself.
And here we are. One left and one right side bracket fabricated and ready to mount. Bob is in the process of mounting the fenders to the bracket and then they head in for primer. Today I’m constructing the body mount brackets that fasten the body to the shaft frame. Then the rear spring mount bracket. With any luck and limited interruptions we might have some steps today too.
Have a great Tuesday. I’m off for breakfast with the guys. Maybe I’ll wear my new shoes…
Ciao!
T
Subscribe to:
Posts (Atom)