Saturday, May 30, 2009

The Glam Life of a Carriage Guy - Part 1

So last week I get a call from an old friend who happens to have some carriages in her garage that‘s about ready to fall down on top of them. She says “Todd, you better come and buy these vehicles”. So Wednesday evening I drive over to take a look. It’s definitely a pile of carriages in a garage that‘s about ready to fall down on top of them. It doesn’t take too long to inspect this group because you really can’t see anything anyway. So we each hedge our bets and I leave without a deal.


She gives me a call on Friday and we find some room in the middle and we work it out. So Saturday is moving day. There is this building, poles, shafts and wheels in another, and seat cushions in another. So we dig it all out and start to load up.


I have a 36’ gooseneck trailer so it’s pretty good sized but it still fills up fast. After about an hour of pulling, dragging, hauling and stuffing I have it in the trailer.


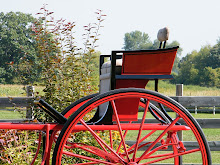
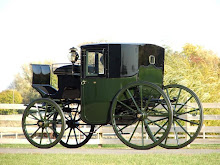
There is an extension top surrey, two runabouts, a Portland cutter, a running gear and a bunch of other poles, shafts and odds and ends.


If you have ever wondered what 30 years of eeuuuwwww looks like here it is. Someone was apparently living here as there is a nice little nest and plenty of poop in brand of raccoon. Not too unusual to find vehicles like this. They are often stashed away in an old barn that has plenty of doggy doors for rodents, raccoons and god knows what else.


So I'm dragging it all back out. The axles are a bit rusty as the wheels have been removed from the gears. So I’m cleaning up the spindles a bit and putting on some grease so they will actually roll which is a nice feature at a time like this.


The surrey on the far right has been removed from it’s chassis. The chassis is laying on the lawn over on the left. I still have no idea if any wheels are going to fit. I manage to roll the surrey body out on a pair of wheels and an axle. Otherwise I have the trailer nearly empty but it’s pushing 2:00 and I need to get this stuff together, cleaned up a bit and put in a building.


There are four chassis and 16 wheels so I guess that’s a good sign. Let’s hope they all match.


So check back on Monday to see the results. I had a long day of loading, unloading, putting together, cleaning and putting away. I didn’t quite make it and the lawn looks like an auction will be held here tomorrow. But I did manage to get three vehicles under roof. This is really messy, dirty, hard work but some of my best memories of the carriage trade are rooting around in old barns. You never know what you will come across and today was a good day. See you on Monday.

Best!
Todd

Friday, May 29, 2009

Brewster Coach Lamps Restored

One of the first things we dealt with when it came to the restoration of this Brewster Coach was the lamps. This pair of Brewster marked lamps are original to this coach which is a rarity in itself.


They were in really remarkable condition. We had a couple small dents to deal with but otherwise the bodies of both lamps where very solid and clean.


He hand strip the exterior of the lamps down to bare metal. We find no real surprises. Everything is solid, straight and original. The lamp on the right is showing one of the small dents that needed repair.


Before we go any further we completely clean and polish the interior silver. The interior of each lamp is in outstanding condition so fine polish and elbow grease is the tool of choice. Exterior brass bezels and exposed brass trim is polished at this point as well. Once cleaned all polished parts are masked and prepared for primer.


We now have the lamps in primer. This photo was taken during the final sanding of the second primer coat. Once we have both lamps sanded the masking tape will be removed and replaced with new prior to paint.


The freshly painted lamps are ready to install on the coach. Of course the coach is a long ways away from being ready for the lamps. So off to storage they go waiting for the bigger part of the project to catch up. Click on any photos to enlarge.

It looks like a great weekend coming up in Wisconsin. Our showroom is open today and Saturday from 10 until 4 so if you are looking for a little getaway come by for a visit.

Best!
Todd

Thursday, May 28, 2009

Albany Cutter or Porsche Boxter?

The Albany Cutter is a real crowd pleaser when it comes to sleighs. The elegant sporty lines and the often flamboyant art was the signature of the Albany. They were fast and sleek. Not necessarily built for comfort but more for speed.


I always equate the Albany Sleigh to a sports car. A Porsche Boxter. Nimble, quick, light and all about style. Elegant flowing lines that look fast even when it’s standing still.


Extensive amounts of hand painted artwork and striping are synonymous with the Albany Cutter. What might be described as rosemaling is often used in the panels of the body.


We restored this sleigh a few years ago and it now resides in Northern Wisconsin. The mohair upholstery is plush and traditional.


This particular sleigh had it’s original artwork intact prior to the restoration. The scrolling decoration on the sides culminating with the buck deer is recreated from the original.


I have always considered sleighs a work of art. Not just in the surface treatments of artwork that decorate the body but as an art form in themselves. The grace of the body and how they flow with the runners is beautiful. The skills needed to produce an Albany Cutter at the turn of the last century were remarkable. The entire body of this vehicle is made of steam bent wood. Fitting and joining the bent wood panels into not only a work of art but a functional form of transportation is quite a feat.

Have a great day.

Best!
Todd

Tuesday, May 26, 2009

Park Drag by Brewster

With the body removed from the coach it is easy to work on but needs to be portable. We frame up a metal dolly for this body. It is now portable and easily moved from shop to paint booth.


We are in the process of stripping the body. Getting the majority of the original paint and base coat off of the wood body is important for adhesion of the new finish. The removal of the paint is going well and we are pleased to find very solid body panels and no big surprises.


The rear boot door has been removed and is being stripped separately. The side doors will be removed shortly and be undergoing that process as well.


There was one body panel that was cracked. A pretty easy replacement on the front of the body so we pull it off and prepare it for replacement.


While we work on the body we are also cleaning metal parts. Here the lazy backs and seat rails have been removed and blasted. They will move to the primer phase from here.


The groom seat supports have been cleaned and prepared for primer. Also some steps and seat rails in the mix. On a large coach such as this there is a large quantity of parts. We devote separate areas for each project we have in the works. It makes the job go much smoother by staying organized.

Best!
Todd

Saturday, May 23, 2009

Talk About A Great Body

So we are back on the Brewster Park Drag restoration today. The second greatest challenge of any carriage restoration is removing the body. The biggest challenge? Putting it back on once it’s painted, upholstered and trimmed out. I would estimate the weight of this body at about 700 to 800 pounds so not huge but still a pretty substantial piece of lumber.


Before we remove any large portion of a vehicle such as this we create a large file of photos. Notes and diagrams of connections and construction details are compiled. That is the best reference when it comes to assembly which can be months later.


All fasteners between the body and the chassis are removed. In a case like this we prefer leaving all the springs on the chassis so we disconnect as much from the body as possible. Keep as much weight on the ground as we can and lighten the load up above. The body lifts off with ease and the chassis is rolled out.


We now have the body completely off as it rests partially on saw horses. From here the body needs to be mobile. The best way to make that happen is on a small four wheel dolly that will allow the body to be portable but easy to work on. Tomorrow we remove the doors and any remaining hardware and begin the process of paint removal.

Best!
Todd

Friday, May 22, 2009

New Sprint SP2 Debut

The new SP2 made it’s debut yesterday and we are very pleased with the results. The cart has served our customers well over the years but it was time for an update. The Sprint SP2 and the CX2 are our best selling vehicles. The CX2 shares the same frame as the SP2 and we will be producing the new CX2 within a month.


SP2 is short for Sprint Pleasure 2 Wheel Cart. It is designed to be durable, practical and have amenities that people are looking for in a modern vehicle. That being said we have so many customers that like the look of a traditional wood carriage that we have created the SP2 to fill that need. The new frame is 1.5” diameter steel tube bent to create the form of the body.


All Sprint carts are fitted with spring assisted shock absorbing suspension. The cart is adjustable in height quickly and easily by changing the location of the top shock mount.


This particular cart was fitted with some options like wood shafts. The shafts on the base model Sprints are 1.5” diameter steel tube rather than the wood. The wood shafts are fastened to a steel frame and are easily removed just like the steel shafts. This cart also features the following additional options, tufted seats, spares box, walnut stain color and patine shaft trim.


All Sprint carts are equipped with an adjustable seat. With the pull of a lever the seat adjusts forward and back for driver comfort.


All steel components on our Sprint carts are powder coat finished. The wood parts are sanded and clear finished using a two step process resulting in a smooth high gloss shine.


The SP2 is available in pony thru draft sizes this one being large pony size. We have a number of other options and configurations for the Sprints which you can see at www.colonialcarriage.com. We are busy filling orders for Sprint carts year around. We normally have in stock units available and we ship nationwide. You can click on any photo to see an enlarged view.

So it sounds like pretty good weather in Wisconsin for Memorial Day Weekend. I hope you have a great one.

Best!
Todd

Thursday, May 21, 2009

Brewster Park Drag

We were on a search for a unique Park Drag for a client. This one surfaced and from a size and history standpoint it really fit the bill. The coach was acquired in Virginia and had not been driven in a number of years. An exterior restoration was completed many years prior. The leather interior was original and unusually clean in design and simple.


The original Brewster marked lamps were on the coach and in very good condition. The exterior of the lamps were showing some age and surface rust but all in all very solid and clean. The interior plating and all exterior brass was outstanding and well cared for over the years.


Restoration of the lamps was one of our first orders of business and they are now sitting completed and ready to place back on the coach. This shot of the interior shows the original Brewster marking.


The exterior of the coach was in excellent mechanical condition. There was one panel crack but other than that the body was solid and tight. The exterior had been redone a number of years back. The original finish had been stripped and the body was done in a clear over natural wood. This was not in keeping with the original finish which was paint. We will be duplicating the original finish scheme for our client as the restoration continues.


The wheels are of traditional construction with one big exception. Few Brewster coaches were made with roller bearing hubs. The bearings are a tapered roller much like modern automotive bearings used today. The original bearings were manufactured by Timken which is still a leading producer of bearings today.


Brewster numbered this coach 25895. Upon researching it was but in 1912 for D.R. Hanna. We are quite confident that this is the last coach built by Brewster. The list of notes on the build sheet for this coach is quite unique. There were a number of items deleted from this coach originally in an effort to make it extremely light. Small things such as hand holds on the toe board are missing. Large items like an interior void of tufted and button upholstery saved weight. As we progressed with the restoration we found very thin body panels where heavy solid wood panels would normally be found.


The interior is dark maroon leather. It was done in a clean smooth style with no buttons. The bottom cushions are a thin, light almost pillow style design. I doubt that the original purchaser ever placed a passenger inside the coach.

We have reached a point in this restoration where the chassis is completed and the body is ready for interior and trim. We will be posting progress shots of this project as it went through the stages of restoration all the way through to completion.

Have a great day.

Best!
Todd

Wednesday, May 20, 2009

Brewster Park Drag

Busy, busy day today so a very abbreviated blog. Tomorrow we are going to start showing you a Brewster Park Drag restoration project in the works. Stay tuned...


Have great afternoon.

Best!
T

Tuesday, May 19, 2009

Sneak Peek at the New Sprint

We have been producing the line of Sprint two wheel carts for a number of years. The Sprint has proven itself as a versatile, durable, comfortable and user friendly carriage. We have expanded the line to three models over the years. I felt the time had come for an update.


The main design concepts of the cart are good so no major modifications in the overall design or the suspension system. The frame on the former Sprint is a 1.5” square steel tube with welded joints. One of my main goals in this redesign project is a more streamline appearance to the frame.


We have swapped out the square tube for round on the main frame. We have the ability to bend square tube but I really liked the look of the round tube better. It matches the round tube shaft frames and I like the clean look it offers.


A little fire wrangling shot for those of you that follow that type of thing. You know who you are.


The rear kick plates are ¼” sheet aluminum with a satin black powder coat finish. The floors will remain textured aluminum in satin black powder coat finish on the CX2. The floors of the SP2 will remain solid oak with a high gloss clear finish.


The suspension has been a reliable pair of spring assisted shocks on the first series of Sprint carts. We will maintain the same suspension on the new model.


One of the advantages to the Sprint line is the adjustability of the cart. A series of holes in the frame at the upper shock mount gives you the option of raising or lowering the cart to fit horses of varying height. The axle is also adjustable. This adjustment gives the user the ability to change the weight on the shafts by moving the axle forward or aft.

Watch this blog for updates on the new Sprint CX2 and Sprint SP2. We are currently taking orders for the new Sprint models for June delivery.

Best!
Todd

Monday, May 18, 2009

New Carriage Shafts

So today we have a small project that is rapidly nearing the finish line. A new set of shafts for a Wicker Ladies Phaeton. This carriage belongs to a client and it just happens to be missing its original shafts. For those of you that are not drivers the shafts are the long wood parts that fasten to the front axle of the carriage and extend up each side of the horse. All single horse carriages have shafts and on four wheeled carriages such as this they are typically removable.


The original carriage has Bradley coupling fasteners on the axle so we match the hardware on the new shafts with the antique carriage. The Bradley Coupling was a patented design of shaft coupler that was basically a ball and socket. The ball could be clamped tight in the socket and it provided a connector that did not rattle like a bolt or pin through an eye.


So off track here a little but one of the most time consuming parts of carriage restoration is sanding primer. The shafts that we are painting today have already been primed and sanded to be prepared for paint. Taking wood objects and making them look like glass is no easy task. Here Brandon is sanding a wheel making it ready for a second coat of primer.


Every part of a carriage is dismantled, and primed and sanded twice prior to paint.


Springs are completely dismantled and each leaf is blasted, primed and sanded before it goes back together.


So back to the shafts. The original carriage is medium blue. We have matched the blue and they are painted by afternoon.


These shafts will need to cure for a few days before they can really be worked with. The paint dries to the touch but it is pretty tender for several days. By the end of the week we will be able to install shaft trim and pinstripe. A nice shade of blue don’t you think?

Best!
Todd